Selenium is a popular automation testing framework that is primarily used for cross browser testing. It is open source and is ideal for automating testing of web applications across different browsers like Firefox, Chrome, Internet Explorer, Microsoft Edge, etc. Selenium has become a renowned framework and is giving stiff competition to other test frameworks like HP QTP (Quick Test Professional) and AKA HP UFT (Unified Functional Testing).
This tutorial for selenium WebDriver will help you develop the basic understanding of the components of Selenium suite, Selenium WebDriver architecture & will show you how to run automation to test a website for cross browser compatibility using selenium webdriver for Google Chrome, Mozilla Firefox and Internet Explorer.
Selenium is a combination of different tools and each tool/block plays a critical role in the automating web-app/website testing. Let’s take a deep dive into the Selenium WebDriver tutorial.
Components of the Selenium Suite
Below are the core components of the Selenium Test Suite
- Selenium Integrated Development Environment (IDE)
- Selenium Remote Control (RC)
- Selenium WebDriver
- Selenium Grid
Now, let’s have a look at these components in details, in this Selenium WebDriver tutorial.
Selenium Integrated Development Environment (IDE)
Selenium IDE is a simple Firefox Plugin and it is used to record & playback scripts. However, the Selenium IDE can only be used to write automation scripts for automating testing of simple use cases. Selenium IDE does not support Conditional statements, Exception handling, loops, screenshot capture, etc.
For automating complex use cases, a majority of developers and testers prefer to opt for Scripting testing instead of Record & Replay testing. The Selenium test suite consists of Selenium Remote Control (RC) or Selenium WebDriver.
Selenium IDE is available for different operating systems namely Windows, Linux, Mac OS, etc. Selenium IDE for Firefox can be downloaded from here.
Selenium Remote Control (RC)
For testing complex scenarios, Selenium Remote Control (RC) can be used. It is based on the client-server model which makes it possible to execute tests on the browser that is controlled by the server. There are client libraries in different programming languages that make it easy for developers to write effective test cases in a programming language in which they are comfortable & have expertise with. Since version 2.25.0, RC has support for Java, C#, Python, Perl, Ruby, etc.
Selenium Server is the core component of the Selenium RC. Some of the core features/responsibilities of the Selenium RC are below
- Contains the core Selenium Framework and it is mainly responsible for injecting the same in the browser [Chrome, Firefox, Internet Explorer, Microsoft Edge, etc.].
- The client program sends commands to the RC which are then interpreted by the server and then sent to the browser.
- After execution, the results are sent back to the client.
- The Client & Server communicate via the normal mechanism of HTTP GETS and POSTs. Which is well versed with client-server concepts can manage to write test code with Selenium & WebDriver with ease.
As mentioned earlier in our Selenium WebDriver tutorial, the Selenium RC supports different browsers, unlike Selenium IDE which is only available for Mozilla Firefox. The downside of Selenium RC is that it does not support record & playback functionality which can be vital in the automation of test cases where tasks are repetitive, especially for regression testing. Before executing the tests using Selenium RC, an instance of the Selenium RC Server should be manually invoked and that instance should be running throughout your entire test cycle.
Selenium WebDriver
The primary focus of our Selenium WebDriver tutorial. By far, we know that Selenium IDE is GUI based, where Selenium RC is a standalone Java program that will allow you to execute HTML test suites. Selenium WebDriver framework is more widely used when compared to Selenium IDE & Selenium RC.
Unlike Selenium RC which is based on the client-server model, Selenium WebDriver framework is implemented through a browser-specific driver e.g. each browser will have its corresponding WebDriver application on which the automation testing would be performed.
Hence, Selenium WebDriver directly communicates with the browser due to which it does not require any separate component like the Selenium Server. It supports top programming languages helpful for a software tester namely C#, Ruby, Java, Python, Perl, etc. Before you go ahead in this Selenium WebDriver tutorial, make sure to download the Selenium WebDriver for the browser on which cross browser testing is being performed. You can download Selenium WebDriver from the links that are mentioned below:
Firefox
Chrome
IE
Microsoft Edge
Selenium Grid
Serial testing is fine till the time you have to test code that is confined to few browsers, operating systems, or devices. However, the testing methodology would falter once testing has to be formed in an environment that has multiple combinations. This is where Parallel testing can be extremely useful since it can accelerate the whole testing process.
Parallel testing can allow you to perform a similar test case across different test configurations, simultaneously. You could also simultaneously execute different test cases in the same browser. There is a lot more to parallel testing, but that may deviate our focus from our Selenium WebDriver tutorial. Don’t worry though, we will be upcoming with an article on parallel testing very shortly.
Back to basics, Selenium Grid is mainly used for parallel testing since it helps in running tests on different machines against different browsers & operating systems, simultaneously. It does the job in conjunction with Selenium RC. An example that showcases the usage of Selenium Grid is below
from selenium import webdriver
from selenium.webdriver.common.keys import Keys

desired_cap = {
'platform' : 'win10',
'browserName' : 'chrome',
'version' :  "67.0",
}

url = "https://username:acsessToken@{LMABDA GRID URL}/wd/hub"

driver = webdriver.Remote(
    desired_capabilities=desired_cap,
    command_executor= url
)

driver.implicitly_wait(1)
driver.get("http://www.google.com/")
driver.quit()
Selenium WebDriver Architecture
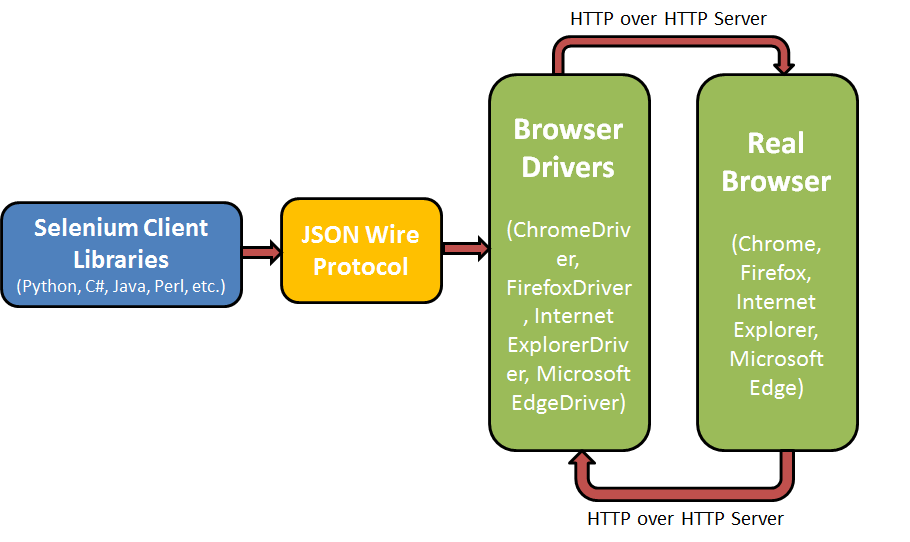
As a part of Selenium WebDriver tutorial, it is imperative to have a look at the major blocks that comprise the Selenium WebDriver architecture:
- Selenium Client Libraries
- JSON Wire Protocol
- Browser Drivers
- Browsers
Let’s have a look at each component in more detail.
Selenium Client Libraries
As mentioned earlier, developers can use Selenium to write test code in different languages like C#, Java, Python, Perl, etc. The multi-language support is possible due to Selenium Client Libraries or Selenium Language Bindings.
For example, if you are writing code in Python, you would require Python client libraries. Selenium Client Drivers for different programming languages can be downloaded from here.
JSON Wire Protocol
JSON (JavaScript Object Notation) Wire Protocol facilitates the transfer of data between the Client & Server. It is the REST (Representational State Transfer) based API. Each browser will have its own browser driver.
Browser Drivers
Browser Driver is mainly used for communicating with the browsers. Since the internal logic of the browser & its functionality is not revealed, Browser Driver ensures the necessary layer of ‘encapsulation’ in order to keep execution level details more abstract. Each browser has its corresponding Browser Driver. Please refer to the section titled Selenium WebDriver in this Selenium WebDriver tutorial, that section contains deleted information about the location from where you can download the Browser Drivers.
Browsers
Since Browser Drivers are available for popular browsers like Chrome, Firefox, Internet Explorer, Safari, Microsoft Edge, etc., you can use either of them for performing cross browser testing. It should be noted that you cannot perform cross browser testing of a website on a browser whose Browser Driver is not publicly available.
Cloud Selenium Grid
LambdaTest offers an on-cloud Selenium Grid to help you fast track your automation testing process. The Selenium Grid offers more than 2000 real browsers and browser versions running on numerous operating systems. You can execute parallel testing using LambdaTest Selenium Grid without worrying about installing any heavy infrastructure on your local machine, plus you get a wide variety of browsers to maximize your test coverage.
Number of parallel sessions you can run depends entirely on the concurrent sessions you have opted for. Parallel testing can help you trim down your test cycles drastically. For instance, say you have a test suite which takes 60 minutes without parallel testing.
Now, if you have 2 concurrencies then you can run 2 tests simultaneously, trimming your total test time to 30 mins. Similarly, if you have 3 concurrencies then the total test time trims further down to 20 minutes. Use LambdaTest concurrency calculator to compute how many concurrent sessions you may need according to your test suite.
Selenium WebDriver In Action
Now that you are aware of the basics of Selenium and Browser Drivers, it is time we have a look at a simple WebDriver script in our Selenium WebDriver tutorial. Before we look at the example, please make sure that you have the programming environment ready i.e. download the IDE of your choice (We are using Eclipse with all the required packages/software downloaded from the Eclipse Marketplace). The Selenium Plugin for Eclipse can be downloaded from here. The sample code has been written in the Python language, but you can write the test code in C#, Java, Perl, Ruby, etc.
Firefox WebDriver Example
Since the test code will be communicating with the Browser (Chrome, Firefox, Internet Explorer, etc.), please ensure that the corresponding Client Library/WebDriver is installed in your machine. Please refer the section Browser Drivers on how you can download the corresponding WebDriver.
Below is a sample code that uses Selenium, Firefox WebDriver to open a webpage
# Import the necessary modules for development
import time
import unit test
from selenium import web driver

# Invoke a new Firefox Instance
ff_driver = webdriver.Firefox()

# Blocking wait of 30 seconds in order to locate the element
ff_driver.implicitly_wait(30)
ff_driver.maximize_window()

# Open the required page
ff_driver.get("http://www.lambdatest.com")

# Sleep for 10 seconds in order to see the results
time.sleep(10)

# Close the Browser instance
ff_driver.close()
Let us perform a code-walkthrough. Before we perform any action, all the necessary modules are imported using the ‘import’ statement [Lines 2~4]. In the test code, we make use of the Firefox WebDriver since the testing is done against the Firefox Browser [Line 7]. In the code,
selenium.common.exceptions.WebDriverException: Message: 'operadriver' executable needs to be in PATH
The error message was displayed when we try to load the WebDriver for the Opera browser (without the WebDriver installed on the machine). In order to get rid of the error, you should install the WebDriver for Opera from here.
ff_driverselenium.common.exceptions.WebDriverException: Message: 'operadriver' executable needs to be in PATH
The error message was displayed when we try to load the WebDriver for the Opera browser (without the WebDriver installed on the machine). In order to get rid of the error, you should install the WebDriver for Opera from here.
Once all the operations on the Browser are complete,
ff_driver.close() In order to execute the code, you can invoke CTRL+F9 in Eclipse IDE or compile the code using Python command-line options
Chrome WebDriver example
In the previous section in our Selenium WebDriver tutorial, we used the Firefox WebDriver. In this section of Selenium WebDriver tutorial, we look at the changes that are required in case you are using the Chrome browser for testing. You should ensure that the standalone ChromeDriver binary (which is different than the Chrome browser binary) is available in the right path or it is present as a part of the webdriver.chrome.driver environment variable.
If you are using Windows, you need to first download the Chrome WebDriver from here. Paste ChromeDriver.exe in the location where you have installed Python (In our case, it was the default installation path i.e. C:\Python27\Scripts). You have to just load the corresponding WebDriver [Line 8] and the rest of the code remains the same. Below is the code snippet, with the change (required for Chrome WebDriver) highlighted in a different color:
# Import the necessary modules for development
import time
import unit test
from selenium import web driver

# Invoke a new Chrome Instance
ff_driver = webdriver.Chrome()

# Blocking wait of 30 seconds in order to locate the element
ff_driver.implicitly_wait(30)
ff_driver.maximize_window()

# Open the required page
ff_driver.get("http://www.lambdatest.com")

# Sleep for 10 seconds in order to see the results
time.sleep(10)

# Close the Browser instance
ff_driver.close()
Internet Explorer WebDriver Example
So far in our Selenium WebDriver tutorial, we have demonstrated cross browser testing using the Firefox WebDriver & Chrome WebDriver. In this section of the Selenium WebDriver tutorial, we look at the changes that are required in case you are using the Chrome browser for testing. You should download the correct Internet Explorer WebDriver (32 bit/64 bit) from here or here. Paste InternetExplorerDriver.exe in the location where you have installed Python (In our case, it was the default installation path i.e. C:\Python27\Scripts) or any other location of your choice.
If you copy the InternetExplorer WebDriver in the path where Python executable is present, you need not mention the ‘absolute path’ while loading the Web Driver [Line 7]. In the other case, you have to specify the absolute path [Line 9]. Below is the code snippet, with the change (required for IE WebDriver), highlighted in a different colour:
# Import the necessary modules for development
import time
import unit test
from selenium import web driver

# Method 1 - Invoke a new IE Instance
ff_driver = webdriver.Ie()
# Method 2 - Invoke a new IE Instance
ff_driver = webdriver.Ie("path\to\IEDriverServer.exe")

# Blocking wait of 30 seconds in order to locate the element
ff_driver.implicitly_wait(30)
ff_driver.maximize_window()

# Open the required page
ff_driver.get("http://www.lambdatest.com")

# Sleep for 10 seconds in order to see the results
time.sleep(10)

# Close the Browser instance
ff_driver.close()
At last, in our Selenium WebDriver tutorial we will have a look at another example where we make use of ActionChains module which is used to automate low level interactions like mouse movements, button movements, context menu interactions, etc to ensure a robust UI design. More details about ActionChains can be found here.
# Import the necessary modules for development
import time
import unittest
from selenium import webdriver
from selenium.webdriver.common.keys import Keys
from selenium.webdriver import ActionChains

# Invoke a new Firefox Instance
ff_driver = webdriver.Firefox()

# Blocking wait of 30 seconds in order to locate the element
ff_driver.implicitly_wait(30)
ff_driver.maximize_window()

# Open the Home Page
ff_driver.get("https://www.lambdatest.com/")

# Look for the Search Element and enter the Search Criteria

search_criteria = ff_driver.find_element_by_link_text("Support")
actionChains = ActionChains(ff_driver)
actionChains.context_click(search_criteria).perform()
time.sleep(5)

# Perform action on the Images Link
ActionChains(ff_driver) \
    .key_down(Keys.CONTROL) \
    .click(search_criteria) \
    .key_up(Keys.CONTROL) \
    .perform()

# Sleep for 10 seconds in order to see the results
time.sleep(10)

# Close the Browser instance
ff_driver.close()
As seen in the above example code, we retain the code for creating the Firefox WebDriver instance [Lines 9~16]. There are a couple of new modules that are imported – ActionChains and Keys. Once the desired webpage i.e. https://www.lambdatest.com/ is opened by the browser, a search operation is performed by looking at the Link Text (using the find_element_by_link_text method). In our example, the Link Text that is searched on the Web Page is ‘Support’ [Lines 20~22].
Once the Search Criteria is encountered, a (CTRL + CLICK) operation is performed, thereby opening that page in a ‘New Tab’ [Lines 26~30]. The ActionChains module is used for performing that operation. The output is below
We have made use of ActionChains since it was apt for the example which we showcased above. You can have a look at the different modules under Selenium WebDriver tutorial module (for Python) here. Though we have used the Python language for implementation, you can make use of the programming language (C#, Java, Perl, Ruby, PHP) of your choice.
Local WebDriver – Not ‘So Scalable’ Approach
Testing using the local WebDriver can be used in case you are planning to test your website/web-app on limited number of ‘browser + operating system + devices’ combination. However, the approach may falter if the number of combinations is more. You cannot have a local setup for every combination since that is not a scalable approach and might also turn out to be very costly.
A better solution would be to leverage capabilities of a platform like LambdaTest where you can perform cross-browser testing on the cloud. Using LambdaTest, you can verify your website/web-application across 2000+ different browsers, operating systems, device configurations, etc. To get started, you need to create an account. Since you would be using Remote WebDriver for testing functionalities of your web application, you should make a note about the username & access key from your LambdaTest profile.
Runnning Selenium Script Using Remote WebDriver With LambdaTest
Now that you know about the usage of Selenium WebDriver and the potential shortcomings of using that approach, we look at how you can port your local WebDriver implementation to Remote WebDriver. The core principles of Remote WebDriver are similar to Local WebDriver, except that the Remote WebDriver code may not execute on the same machine from where it is initiated.
Remote WebDriver is based on the client-server model where the server is a simple Java servlet hosted on any modern JEE app server. The Hub/Server loads the tests that have to be executed. It receives test requests from different clients and based on the requirements (termed as desired capabilities), it routes the request to the best-matching/best-fit client.
For example, if your test needs to be executed on ‘Ubuntu OS + Chrome browser), the Server/Hub would scan through the capabilities of the Clients/Nodes registered with the server and divert the request to the Client with matching capabilities. There can be only one server and number of clients in the Selenium Grid architecture. More detailed information about Remote Driver API can be obtained on other blogs on the LambdaTest website.
Once you are logged in to LambdaTest, you should generate the capabilities required by the nodes by visiting LambdaTest Capabilities Generator. Choose your preferred programming language (in our case it is Python) and the appropriate OS/Browser combination. You can enable the Screenshot and Video Recording features while setting the capabilities. As shown below, our requirement is the test should execute on Firefox (version 64.0) which is installed on a Windows 10 machine. The capabilities for the requirement are below
capabilities = {
		"build" : "Remote WebDriver Testing",
		"name" : "Remote WebDriver Testing example",
		"platform" : "Windows 10",
		"browserName" : "Firefox",
		"version" : "64.0",
	}
Below is the screenshot from LambdaTest Capabilities Generator
Since we would be using the Selenium Grid on the LambdaTest server, we need to modify our code to access their cloud infrastructure (also termed as Remote URL). The remote URL is shown below
/* user_name – userid for login on Lambdatest */
/* app_key – Access token obtained from Lambdatest */
remote_url = "https://" + user_name + ":" + app_key + "@hub.lambdatest.com/wd/hub"
@hub.lambdatest.com/wd/hub is the Selenium Grid setup on LambdaTest where the test would be executed. For user-authentication purpose, the user_name (used for registration on LambdaTest) & app_key (access-token) are appended to the Grid URL.
The concatenated string forms the remote_url. Now that you are aware about the Remote WebDriver API and capabilities generator, let’s port our earlier example to suit these requirements.
import time
import unittest
from selenium import webdriver
from selenium.webdriver.common.keys import Keys
from selenium.webdriver import ActionChains
import urllib3

#Set capabilities for testing on Firefox
ff_caps = {
        "build" : "Remote WebDriver Testing",
        "name" : "Remote WebDriver Testing example",
        "platform" : "Windows 10",
        "browserName" : "Firefox",
        "version" : "64.0",
    }

username="<user-name>"
accessToken="<access-token>"

# gridUrl: gridUrl can be found at automation dashboard
gridUrl = "hub.lambdatest.com/wd/hub"

url = "https://"+username+":"+accessToken+"@"+gridUrl

# Invoke a new Firefox Instance
#ff_driver = webdriver.Firefox()

urllib3.disable_warnings(urllib3.exceptions.InsecureRequestWarning)
# Porting local webdriver to Remote WebDriver on LambdaTest server
ff_driver = webdriver.Remote(
           command_executor=url,
           desired_capabilities=ff_caps
)

# Blocking wait of 30 seconds in order to locate the element
ff_driver.implicitly_wait(30)
ff_driver.maximize_window()

# Open the Home Page
ff_driver.get("https://www.lambdatest.com/")

# Look for the Search Element and enter the Search Criteria

# We are commenting this code since we are doing basic verification
# search_criteria = ff_driver.find_element_by_link_text("Support")
# actionChains = ActionChains(ff_driver)
# actionChains.context_click(search_criteria).perform()

ff_driver.close()
ff_driver.quit()
Let’s do a code walkthrough, especially the major changes
- The username & accessToken is appended to the gridURL. The combination forms the Remote URL on which the test case execution is performed.
- The webdriver.Remote API is used instead of local WebDriver API. The Remote WebDriver API has two arguments – command_executor : Grid setup on which the test is performed and desired_capabilities : Desired capabilities/requirements of the node. Based on these capabilities requirement, appropriate node is selected on which the code is executed.
In order to check the status of the test, you need to visit your LambdaTest dashboard. You can search the test via its Build-name that is used in formation of the capabilities. A screenshot of the above test being executed on the LambdaTest Grid is below.
There are various options on the Output panel that can be instrumental while debugging. Some of the major options are below.
- Exception – Lists the exceptions that are encountered during the execution of the test code.
- Logs – This tab shows the Selenium logs as well as the Console logs. It can be very handy for debugging your code.
- MetaData – It contains detailed information about the test environment on which the testing was performed. In our case, the test is executed on Firefox 64.0 which is installed on Windows 10 machine. You can even get details about the browser configuration.
Parallel Testing – Accelerate Your Test Cycles
One feature on LambdaTest that can accelerate your entire testing process is Parallel Testing. Based on the pricing model that you opt for, you can concurrently execute tests so that the overall test execution time is reduced. In our case, we can have 2 concurrent sessions. More the time number of concurrent times, lesser would be the test execution time.
To demonstrate the feature of Parallelization, we perform two test executions in a concurrent fashion. Along with the previous example (parallel_test_example-1.py), we execute the second test (parallel_test_example-2.py) concurrently with it.
import time
import unittest
from selenium import webdriver
from selenium.webdriver.common.keys import Keys
from selenium.webdriver import ActionChains
import urllib3

#Set capabilities for testing on Chrome
ch_caps = {
        "build" : "Remote WebDriver Testing",
        "name" : "Remote WebDriver Testing example on Chrome",
        "platform" : "Windows 10",
        "browserName" : "Chrome",
        "version" : "71.0",
    }

username="<user-name>"
accessToken="<access-token>"

# gridUrl: gridUrl can be found at automation dashboard
gridUrl = "hub.lambdatest.com/wd/hub"

url = "https://"+username+":"+accessToken+"@"+gridUrl

# Invoke a new Firefox Instance
#ff_driver = webdriver.Firefox()

urllib3.disable_warnings(urllib3.exceptions.InsecureRequestWarning)
# Porting local webdriver to Remote WebDriver on LambdaTest server
ff_driver = webdriver.Remote(
           command_executor=url,
           desired_capabilities=ch_caps
)

# Blocking wait of 30 seconds in order to locate the element
ff_driver.implicitly_wait(30)
ff_driver.maximize_window()

# Open the Home Page
ff_driver.get("https://www.lambdatest.com/")

# Look for the Search Element and enter the Search Criteria

# We are commenting this code since we are doing basic verification
# search_criteria = ff_driver.find_element_by_link_text("Support")
# actionChains = ActionChains(ff_driver)
# actionChains.context_click(search_criteria).perform()

ff_driver.close()
ff_driver.quit()
Execute the two tests in parallel on two different terminals by invoking the python command.
Below is the screenshot of Automation Logs where you can see that there are 2 tests executing in parallel.
Conclusion
There are number of advantages of using Remote WebDriver API on a cloud infrastructure like LambdaTest since it accelerates the entire testing process. It is also a highly scalable approach. My making use of Concurrency i.e. parallelization, you can further reduce the overall time spent in automation testing.
That was all from our end in our basic Selenium WebDriver tutorial. We hope this was useful to you. Do share your questions and thoughts on the same in the comment section below. We will be upcoming with more blogs around Selenium WebDriver tutorial, so stay tuned!
Previously published at https://www.lambdatest.com/blog/selenium-webdriver-tutorial-for-cross-browser-testing/