When you’re creating a chatbot, your goal should be to make one that it requires minimal or no human interference. This can be achieved by two methods.
With the first method, the customer service team receives suggestions from AI to improve customer service methods. The second method involves a deep learning chatbot, which handles all of the conversations itself and removes the need for a customer service team.
Such is the power of chatbots that the number of chatbots on Facebook Messenger increased from 100K to 300K within just 1 year. Many popular brands such as MasterCard have been quick to come up with their own chatbots too. Websites connecting chatbots with CMSs has also become a common practice, providing it with a rich source of relevant content.
But, before we get into how your brand can leverage such a chatbot, let’s look at what exactly a deep learning chatbot is.
What is a Deep Learning Chatbot?
A deep learning chatbot learns right from scratch through a process called “Deep Learning.” In this process, the chatbot is created using machine learning algorithms. A deep learning chatbot learns everything from its data and human-to-human dialogue.
Image via Pinterest
The chatbot is trained to develop its own consciousness on the text, and you can teach it how to converse with people. Alternatively, you can teach the chatbot through movie dialogue or play scripts. However, a human-to-human conversation is the preferred way to create the best possible deep learning chatbot. Remember, the more data you have, the better the effectiveness of machine learning will be.
Now that you know what a deep learning chatbot is, let’s try to understand how you can build one from scratch.
Building a Deep Learning Chatbot
1. Prepare Data
The first step of any machine learning related process is that of preparing data. You need to have thousands of existing interactions between customers and your support staff to train your chatbot.
These should be as detailed and varied as possible so that there are ample data points for your deep learning chatbot. This particular process is called the creation of an ontology. Your sole goal in this stage should be to collect as many interactions as possible.
2. Data Reshaping
Depending on your data source, you may or may not need this step. If your data isn’t segregated well, you will need to reshape your data into single rows of observations.
These observations can be called message-response pairs that will be added to the classifier.
The goal of this step is to put one speaker as the response in a conversation. All of the incoming dialogue will then be used as textual indicators that can help predict the response.
You may need to set some restrictions while creating the message-response pairs, such as:
The conversation should only be between two people. This makes it clear who the message is directed towards.Separate messages that are sent within a minute can be combined into one message.To pair a message with a response, the response to the message must come within 5 minutes.
After the reshaping, your message-response pairs may look like this:
Hey, what’s up?Nothing much, enjoying the rain.Today’s been a tiring day.Same here. It’s been really hectic.
Once you’ve accumulated this data, you need to clean the data. You need to remove URLs, image references, stop words, etc.
Image via Medium
3. Pre-Processing
The next step in building a deep learning chatbot is that of pre-processing. In this step, you need to add grammar into the machine learning so that your chatbot can understand spelling errors correctly.
The processes involved in this step are tokenizing, stemming, and lemmatizing of the chats. This makes the chats readable for the deep learning chatbot. You can use the NTLK tool for this, which is available for free.
In the final step of pre-processing, you create parse trees of the chats as a reference for your deep learning chatbot.
4. Select the Type of Chatbot
Once you’re done with the ontology and pre-processing, you need to select the type of chatbot that you’re going to create.
The two major types of chatbots that you can make are:
- Generative – In the generative model, the chatbot doesn’t use any sort of predefined repository. This is an advanced form of chatbot that uses deep learning to respond to queries.
- Retrieval-Based – In this form, the chatbot has a repository of responses that it uses to solve the queries. You need to choose an appropriate response based on the questions, and the chatbot will comply.
The retrieval model seldom makes mistakes as it’s completely based on retrieving data. However, it has its own set of limitations such that it can seem too rigid and the responses may not seem “human.”
On the other hand, a deep learning chatbot can easily adapt its style to the questions and demands from its customers. However, even this type of chatbot can’t imitate human interactions without mistakes.
The generative model of chatbots is also harder to perfect as the knowledge in this field is fairly limited. In fact, the deep learning chatbots still haven’t been able to pass the Turing test.
While retrieval-based chatbots are extremely helpful when your queries are simple, generative ones are needed for complex queries. This is especially true in cases where the chatbot needs to keep track of what was said in previous messages as well. Retrieval-based chatbots can only answer inquiries that are straightforward and easy to answer.
5. Generate Word Vectors
Word vectors are needed when you have frequent usage of words such as LOL, LMAO, etc. They are common words that are used on social media but aren’t part of many datasets.
While it’s easier to use pre-trained vectors, you need to create your own word vectors when there are such words that aren’t there in other word vector lists.
For generating your own word vectors, you need to take the approach of a Word2Vec model. In this, the word vectors are created by the model by looking at how these words appear in sentences.
Those words that have similar contexts will be placed closer in the vector space. You can use a Python script to train your Word2Vec model. Alternatively, you can use TensorFlow Seq2Seq function for the same.
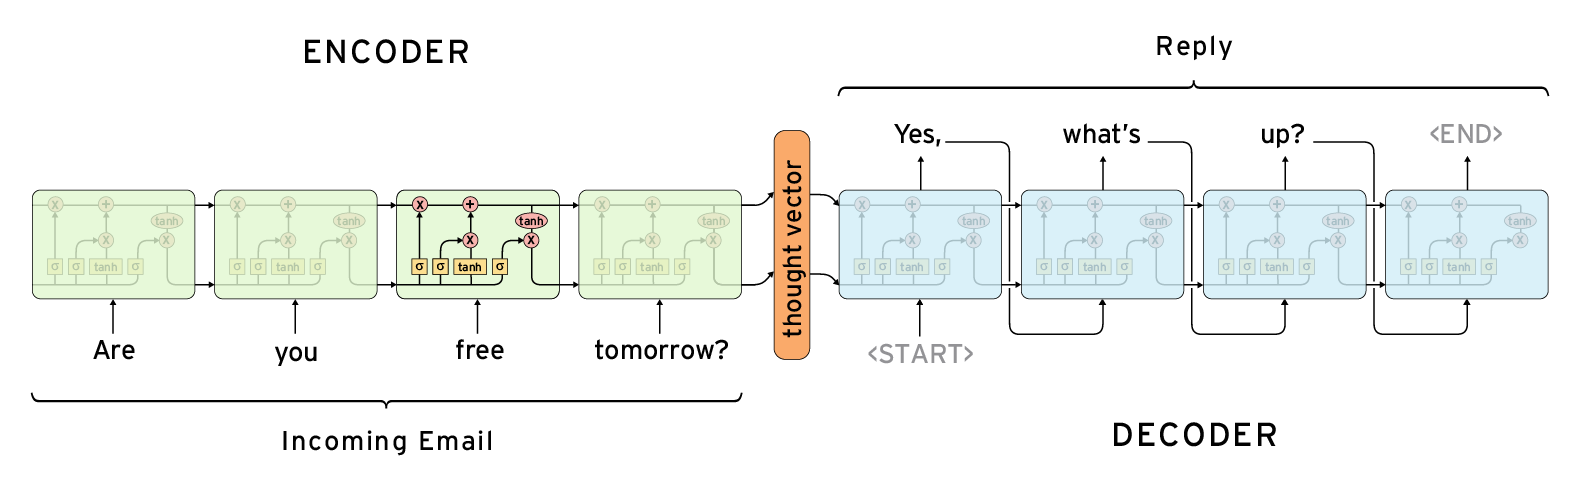
6. Create a
Seq2SeqTo create the
Seq2SeqAll you need to do is follow the code and try to develop the Python script for your deep learning chatbot. The most important part of this model is the
embedding_rnn_seq2seq()7. Track the Process
Now that you’ve created your
Seq2SeqYou should test the chatbot at different points in the loop through an input string. You’ll get non-pad and non-EOS tokens back in the output.
Initially, most of your responses will be blank as the chatbot will only output the padding and EOS tokens. Eventually, your chatbot will start answering with small output strings such as LOL, which are used frequently.
Slowly, the chatbot will begin developing its responses and come up with longer and more complete sentences. You will find that the answers will have a better structure and grammar over time.
8. Add it to an Application
Now that your
Seq2SeqYou need to start by setting up a Heroku server. This can be done by downloading the Heroku toolbelt. Next, you need to install Node, create a new folder, and start a new Node project. It’s also necessary to install all the additional Node dependencies. This can be done by:
npm install express request body-parser –save
The next step is to create an index.js file and authenticate the bot by:
‘use strict’
const express = require(‘express’)
const bodyParser = require(‘body-parser’)
const request = require(‘request’)
const app = express()
app.set(‘port’, (process.env.PORT || 5000))
// Process application/x-www-form-urlencoded
app.use(bodyParser.urlencoded({extended: false}))
// Process application/json
app.use(bodyParser.json())
// Index route
app.get(‘/’, function (req, res) {
            res.send(‘Hello world, I am a chat bot’)
})
// for Facebook verification
app.get(‘/webhook/’, function (req, res) {
            if (req.query[‘hub.verify_token’] === ‘my_voice_is_my_password_verify_me’) {
                        res.send(req.query[‘hub.challenge’])
            }
            res.send(‘Error, wrong token’)
})
// Spin up the server
app.listen(app.get(‘port’), function() {
            console.log(‘running on port’, app.get(‘port’))
})
Create a file and name it Procfile. Paste the following in it:
web: node index.js
After committing all the code with Git, you can create a new Heroku instance by:
git init
git add .
git commit –message “hello world”
heroku create
git push heroku master
You need to then set up your Facebook app just the way I’ve mentioned in this post. After that, set up your chatbot and customize what it says. You can do that by following the tutorial here. It’ll help you wrap things up quickly.
9. Deploy Your TensorFlow Model
Now that your Facebook chatbot is ready, you need to put everything together and deploy your TensorFlow model. You need to use a Flask server to deploy your model as there aren’t many good interfaces between TensorFlow and Node.
The deep learning chatbot’s Express app interacts with is flask server.
The Flask server code can be found here, and the index.js file of your deep learning chatbot can be found here.
10. Test Your Deep Learning Chatbot
The final step for your deep learning chatbot is that of testing it live. You need to head to Facebook and find your page. All you need to do is message your page, and the chatbot will start responding to your messages.
However, the chatbot may take some time before it responds for the first time as the server needs to start up. You can then see how well your deep learning chatbot is performing while responding to your messages.
If the responses aren’t accurate or lack good grammar, you may need to add more datasets to your chatbot.
11. Improvement Methods
After interacting with your deep learning chatbot, you will get insights into how to improve its performance.
Some of the changes that you can make to your chatbot are:
Add more datasets to help it learn better from more conversations. This can help improve its conversation skills and help it give a better variety of responses to queries.You also need to take care of scenarios where the encoder and decoder messages are completely unrelated. For instance, if you have a conversation with the chatbot on one day and then start another one the next day on a completely unrelated topic, then the bot should know. You need to ensure that you train your bot accordingly.Use bi-directional long short-term memories (LSTMs), bucketing, and attention mechanisms.You should also consider tuning your hyperparameters, such as the number of LSTM layers, LSTM units, training iterations, optimizer choice, etc.
Final Thoughts
Deep learning chatbots can learn from your conversations and eventually help solve your customer’s queries. Your goal should be to train them as thoroughly as possible to improve their accuracy.
While developing a deep learning chatbot isn’t as easy as developing a retrieval-based chatbot, it can help you automate most of your customer support requirements.
Just make sure that you spend enough time and effort on reshaping your data and arrange it well into message-response pairs. Pre-processing is the key to developing a solid deep learning chatbot.
Some knowledge of Python is a necessity when designing this chatbot and you’ll need to use TensorFlow, Express, and Node as well.
This article published on Shane Barker’s blog.
About The Author
Shane Barker is the Founder and CEO of Content Solutions and Gifographics. You can connect with him on Twitter, Facebook, LinkedIn, and Instagram.