This article will show how I built a functional static web app with user authentication and a dynamic database for FREE using Webflow, Vault Vision, Cyclic, and Airtable with LowCode
Over the past few weeks, I've spoken to many technology founders starting out with an idea for a software business or service that requires interaction with their customers over the web. One was a service that provides charities a way to publish donation requests, and another was a service that connected delivery drivers to nearby public bathrooms. I discovered a significant obstacle awaiting these founders when they make the transition from a simple static brochure-style website to creating a SaaS application. The transition to a modern SaaS app that needs individual user authentication and controlled access to records typically required a development effort that was out of reach of budgets, thus these entrepreneurs were forced to use email submission forms or online spreadsheets that did not sufficiently meet their auth needs and were cumbersome.
Like any founder, I knew there had to be a better way; with all the new SaaS LowCode tools that offer a FREE plan, surely there is a lowcode and user-friendly solution that doesn’t require hiring a developer to build a custom 3-tier application for thousands of dollars.
To build a fully functional and secure authentication system into SaaS applications, we settled on the following requirements:
- low cost or FREE
- #LowCode, has to be copy/paste-able and quick to self-edit without relying on expensive developers
- All managed infrastructure. Servers, networks, systems, and disks have to be someone else's problem. Once I get it working at noon, it better stays that way through the night, and the job of some other unsung sysadmin if it doesn't
- App users need to be able to login and logout
- App users need to be able to add/update/see their records and data (and ONLY their data)
- Needs to have some pre-built easy admin interfaces for service owners themselves to manage and have access to ALL the data.
- Needs to be point-and-click, copy-and-paste usable for standard features, with an option to have advanced customizable features available with small bits of code.
A modern, secure and reasonable solution is a 3-tier app and how can we make it simple?
- Front End (easy to make simple with web builders like Wix, Webflow, GoDaddy)
- Middle Tier (hmm, this is the struggle, most current options will violate one of the requirements, specifically needing custom development)
- Data Tier (easy to make simple with Airtable)
Let's break down what we need the Middle Tier to actually do.
- Hold an API Key and keep it secure to access Airtable, we can have this in the Front End because that is public, so it has to be in the Middle Tier
- Handle user auth to issue sessions and access tokens to securely identify and authenticate users for both the Front End and the Data Tier
Luckily there are auth services like Vault Vision (disclaimer: the author of this fine article is affiliated with Vault Vision. Please check us out https://vaultvision.com :) )
So Vault Vision can handle the user management and auth with a static website just fine, but there still needs to be a component to store the data API key and to tie the user authentication to the data such that user access to records is controlled and restricted to just the users that should have access. This is where things get interesting and to sum up the problem:
'Can we make a generic, re-usable, middle tier component that does not need "on-going" dev that can hold an API key, validate user authentication tokens and enforce data access constraints, and NOT require developers or system admins to manage and deploy, and can be FREE?'
YES!! It took a bit of inspired determination but where there is a will there is a 'Node-Auth-Airtable' way open-sourced by Vault Vision, designed to run as an Express API serverless App on the Cyclic application platform that does offer a FREE plan.
Here is the GitHub link to the Vault Vision 'Generic Node Auth Airtable Bridge', which you can easily copy/clone to run on Cyclic.
This solution might not be for everyone, but let's go over the pros and cons of this solution vs a standard 3-tier app.
Pros
- FREE, can not overstate how awesome this is for the fledging founder, it is a great way to test out business ideas and service concepts with workable betas.
- #LowCode, can be self-installed and self-edited with a minimal amount of tech knowledge
- Modular, most of the services can be provided by many vendors
- Expandable with simple javascript, complex customization can be added with minimal effort
- Can scale with smaller piece-meal replacements
- Quick to deploy and setup can be done in under 1 hour
- Support available through discord and forums
- Data structures and admin interfaces are simple and excel like
- Low complexity, no abstractions, very understandable
Cons
- Specifically built for Airtable's data API
- Esoteric, not a common architecture pattern
- DELETEs are not really supported, can be done, but there is no 'recycle bin' if a user wipes their own data
- Scalability is limited before upsizing components and infrastructure customization will be needed
- Complex data structures, ACID transactions, and foreign key constraints aren't available
- Components are tightly coupled, and the Front End does need to match data formats to the Data Tier interfaces.
Is this right for you?
If you are looking for a fast and easy way to make a low-cost dynamic web app that users can create and view their own records, all in simple data structures, then YES!
Great use cases are:
- A school that wants to publish grades for students
- Voting or polling application
- Ticket/work request application
- Expense report submission
So on to the nitty gritty details, below are the 11 steps needed to try this out and to get a working example on your own accounts and websites.
Details of the Steps (Warning, many screenshots)
You are going to create 4 accounts and keep track of the following 8 values of id, domains, and URLs, you should keep track of these values in a notepad window for easy reference you will copy and paste them frequently.
- API key (from Airtable)
- baseid (from Airtable)
- table (from Airtable)
- website URL (from Webflow)
- bridge connector URL/domain (from Cyclic)
- tenant domain (site where your login page will be shown) (from Vault Vision)
- client_id (from Vault Vision)
- client_secret (from Vault Vision)
Step 1
Create the Airtable, and make note of these 3 values from the following 2 screens:
- APIKEY
- baseid
- table
When you create the table; make sure your table has a single text column called vv_id (THIS IS VERY IMPORTANT)
Visit: https://airtable.com
Get the API key here.
Step 2
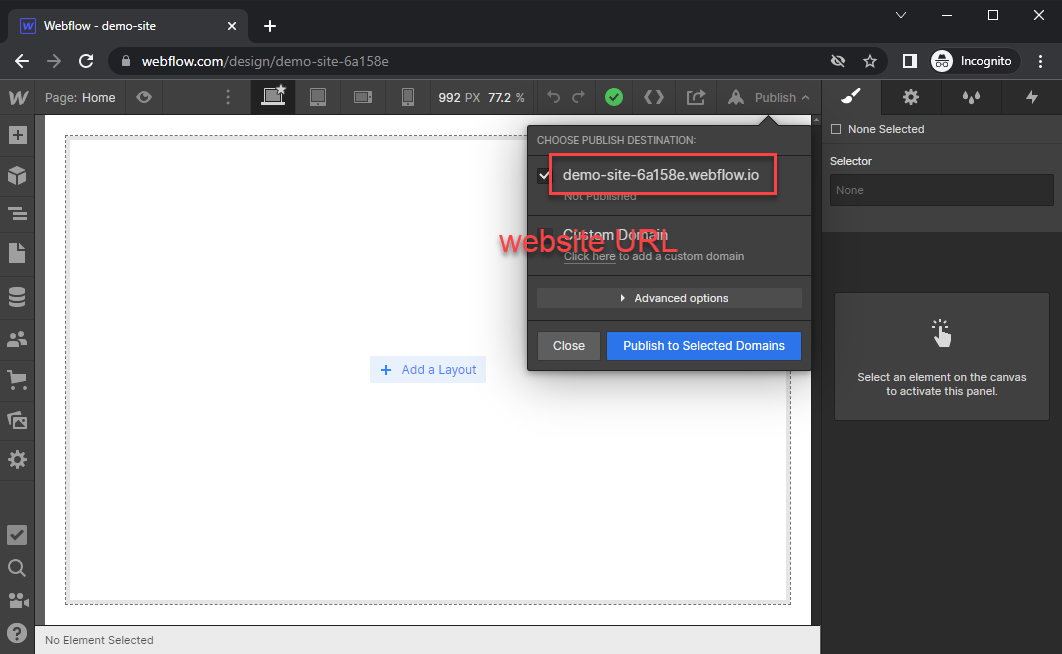
Create your static WebHost on Webflow, make note of:
- Front End website URL
Create a website on Webflow and start with a blank site
Visit: https://webflow.com/dashboard/sites/new
Once created, you can get the website URL here
**Caveat**
For the little bit of js code that we will be using you will need to use the paid version of Webflow OR there are 2 other options, 1) stick to static HTML buttons and HTML forms that you post to your bridge connector and move some of the logic there, OR 2) you can host the static assets on GitHub pages https://pages.github.com/ and create a repo named {your_github_username}.github.io and it will served out of the same https://{your_github_username}.github.io endpoint
Don't worry about the content for now, we will add that later. For now, we just need to get the website URL.
Step 3
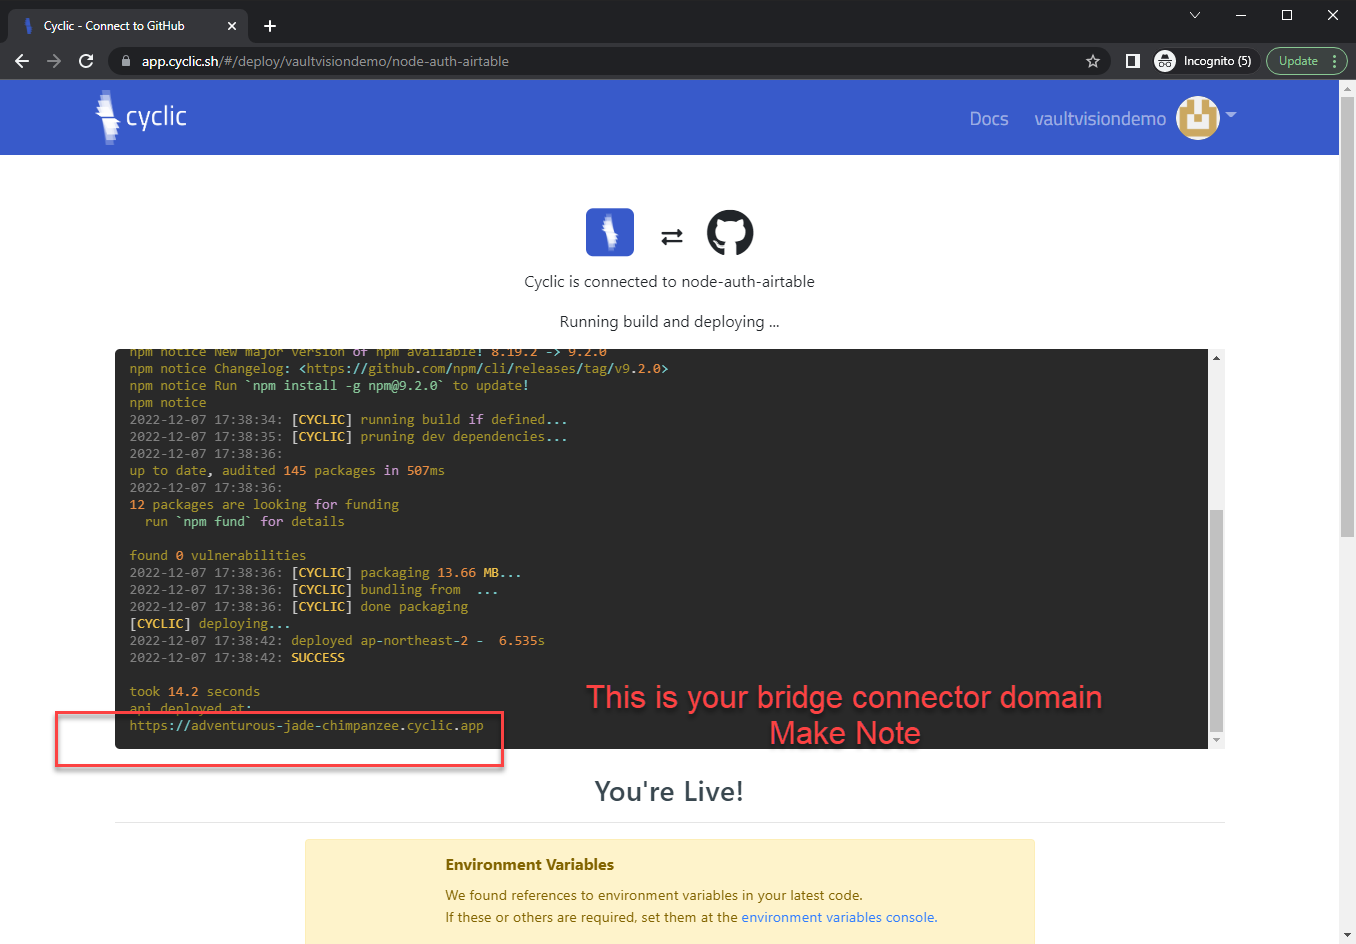
Create your user authentication bridge connector on Cyclic, make note of:
- connector domain name
Create a GitHub account if you don't have one already, Cyclic uses that account for auth and for publishing
Visit: https://github.com/
Fork this repo into your account: https://github.com/vaultvision/node-auth-airtable
Create a Cyclic account and authorize it to access GitHub
Visit: https://www.cyclic.sh/
You will need to give the Cyclic account access to your public GitHub repos.
Select ‘node-auth-airtable’ assuming you forked it from https://github.com/vaultvision/node-auth-airtable
After you select the right repo, Cyclic will ask for final approval to install.
Make note of the bridge connector domain name on this screen
Step 4
Create your Vault Vision authentication tenant and application
Visit: https://manage.vaultvision.com/register
Pick a name for your login page, this will be the domain/URL for page where your users login and signup
Fill in a name for your company, it can be anything you want
Make sure to choose 'Traditional Web App' for the Application Type.
And Pick a name for your application, it can be anything it is never shown to a user, and fill in these values for your application:
The Callback URL must end with /oidc/callback
The Logout URL must end with /oidc/logout
The Login URL is just your homepage URL
Callback URL
-------------------
https://adventurous-jade-chimpanzee.cyclic.app/oidc/callback
Login URL
-------------------
https://demo-site-6a158e.webflow.io (if you are on Webflow)
https://vaultvisiondemo.github.io (if you are on GitHub Pages)
Logout URL
-------------------
https://adventurous-jade-chimpanzee.cyclic.app/oidc/logout
Mmake note of:
- auth tenant domain (site where your login page will be shown)
- client_id
- client_secret
Step 5
Go back to the Cyclic application, and update these variables (under the ‘Variables’ tab in the menu)
Visit: https://app.cyclic.sh/#/app/
Step 6
Go back to Webflow or your GitHub Page and copy and paste the html fragment and script fragments and update these 3 values in the javascript script tag:
- const authhostdomain
- const baseid
- const table
You can get the HTML and script fragment from here:
https://github.com/vaultvisiondemo/vaultvisiondemo.github.io/blob/main/index.html
There are 3 sections, an HTML block, a style block and a script block
In the script block there are 3 const that need to be updated with your unique values
{these are the values for this demo, but you will need to use your unique values}
- const authhostdomain="adventurous-jade-chimpanzee.cyclic.app";
- const baseid = "app8Bj4fSoM2Hv3s9";
- const table = "demo-table";
- const authhostdomain -> provided by Cyclic, it is the domain of your bridge connector (NOT full URL, there should not be https:// added here)
- const baseid -> provided by Airtable, the baseid of your 'base' at Airtable
- const table -> provided by Airtable, the name you chose for your table
All the configuration and setup is now done!! Time to try it out.
Step 7
Create a new account from your front-end (make sure you are not in Incognitio mode, or if you are you enable 3rd party cookies https://knowledge.kaltura.com/help/enabling-3rd-party-cookies-for-chrome-incognito-mode)
Visit: {whatever your front end url is - in our case it was GitHub pages https://vaultvisiondemo.github.io}
Step 8
Add some new data content
The "add Air Table" button will add some static data to your Airtable and automatically attach the correct vv_id (user_id) for the user that you are logged in as.
Step 9
List the data content
The "list Air Table" button will read out all the records that are attached to the correct vv_id (user_id) for the current user that is logged in. You can logout, create a new user and repeat the same process and you will see that each users records are dynamic and only accessible by that user. One user cannot access another users records.
Step 10
Airtable Admin sees all
Back in Airtable you can new see and modify ALL records as the Airtable Admin, and you can see the individual records now attached to each user.
Step 11
User management, you can also manage these users with blocking/deleteing/credential reseting in the User management panel.
Voila!!!
Even though there are several components to this solution, they are all understandable, single purpose based, #LowCode and have some FREE options yet give you dynamic user-based features of full application with the convivence of Webflow and #LowCode building.