If you are building a social app where users can upload images, then content moderation should be the most important task for your developers. If a user uploads any disturbing image on your platform, it may hurt others' sentiments or in the extreme case, it can become a legal issue.
Therefore your best bet should be to remove or blur the NSFW content that violates your content policy. In this tutorial, we are going to look at how to detect NSFW images using machine learning algorithms and then automatically blur the image.
The Problem Statement
If you have thousands or millions of users, then it is not possible to review every image manually and blur them by hand. It needs a lot of manpower and a lot more money.
Even watching hundreds of disturbing images for a human every day can lead to mental illness after some time.
Our Approach
In the era of artificial intelligence and machine learning, we can use AI technologies for our benefit. By using artificial intelligence, we can automatically detect NSFW images and give them an NSFW score. Then we can programmatically blur them as per their NSFW score. It means developers have full control over the NSFW content. Now the natural question that comes to your mind is, How can we make an AI model ourselves?
The obvious answer is you don't need to. We can utilize APIs from any SaaS (software as a service) provided that provides artificial intelligence-based solutions. In this article, we are using Pixlab APIs to automate NSFW detection and blur the image when it goes above a certain NSFW limit.
Agenda of The Article
In this article, we are going to make a web project. With the help of this project, I demonstrate to you,
-
How to detect the NSFW score of an online image.
-
How to detect the NSFW score of a local image.
-
How to blur an image depending on its NSFW score.
This is a long-form article and I am trying to give you as much hands-on practice as I can through this article. I believe that you can make your own NSFW detection system after reading this article. So please grab a cup of coffee and let's start our tutorial.
As I am using Pixlab API endpoints in this tutorial, make sure to get an API key for the same.
Need For a Proxy Server
The Pixlab API is not CORS (Cross-origin resource sharing) enabled. To avoid security issues, our browser doesn't allow us to connect with cross-origin websites. Therefore we need a proxy server to bypass the CORS restriction. Servers don't have CORS restrictions.
So make a Nodejs and Expressjs server and do the basic setup. we write all our server code in server.js file.
var express = require("express");
var cors = require("cors");
var fileUpload = require("express-fileupload");

var app = express();

// To parse application/json
app.use(express.json());

// Enable cors on all request
app.use(cors());

// File upload middleware
app.use(fileUpload());

app.listen(5000, () => {
  console.log("Server is running in port 5000 and cors enable");
});
Get NSFW Score of Online Images
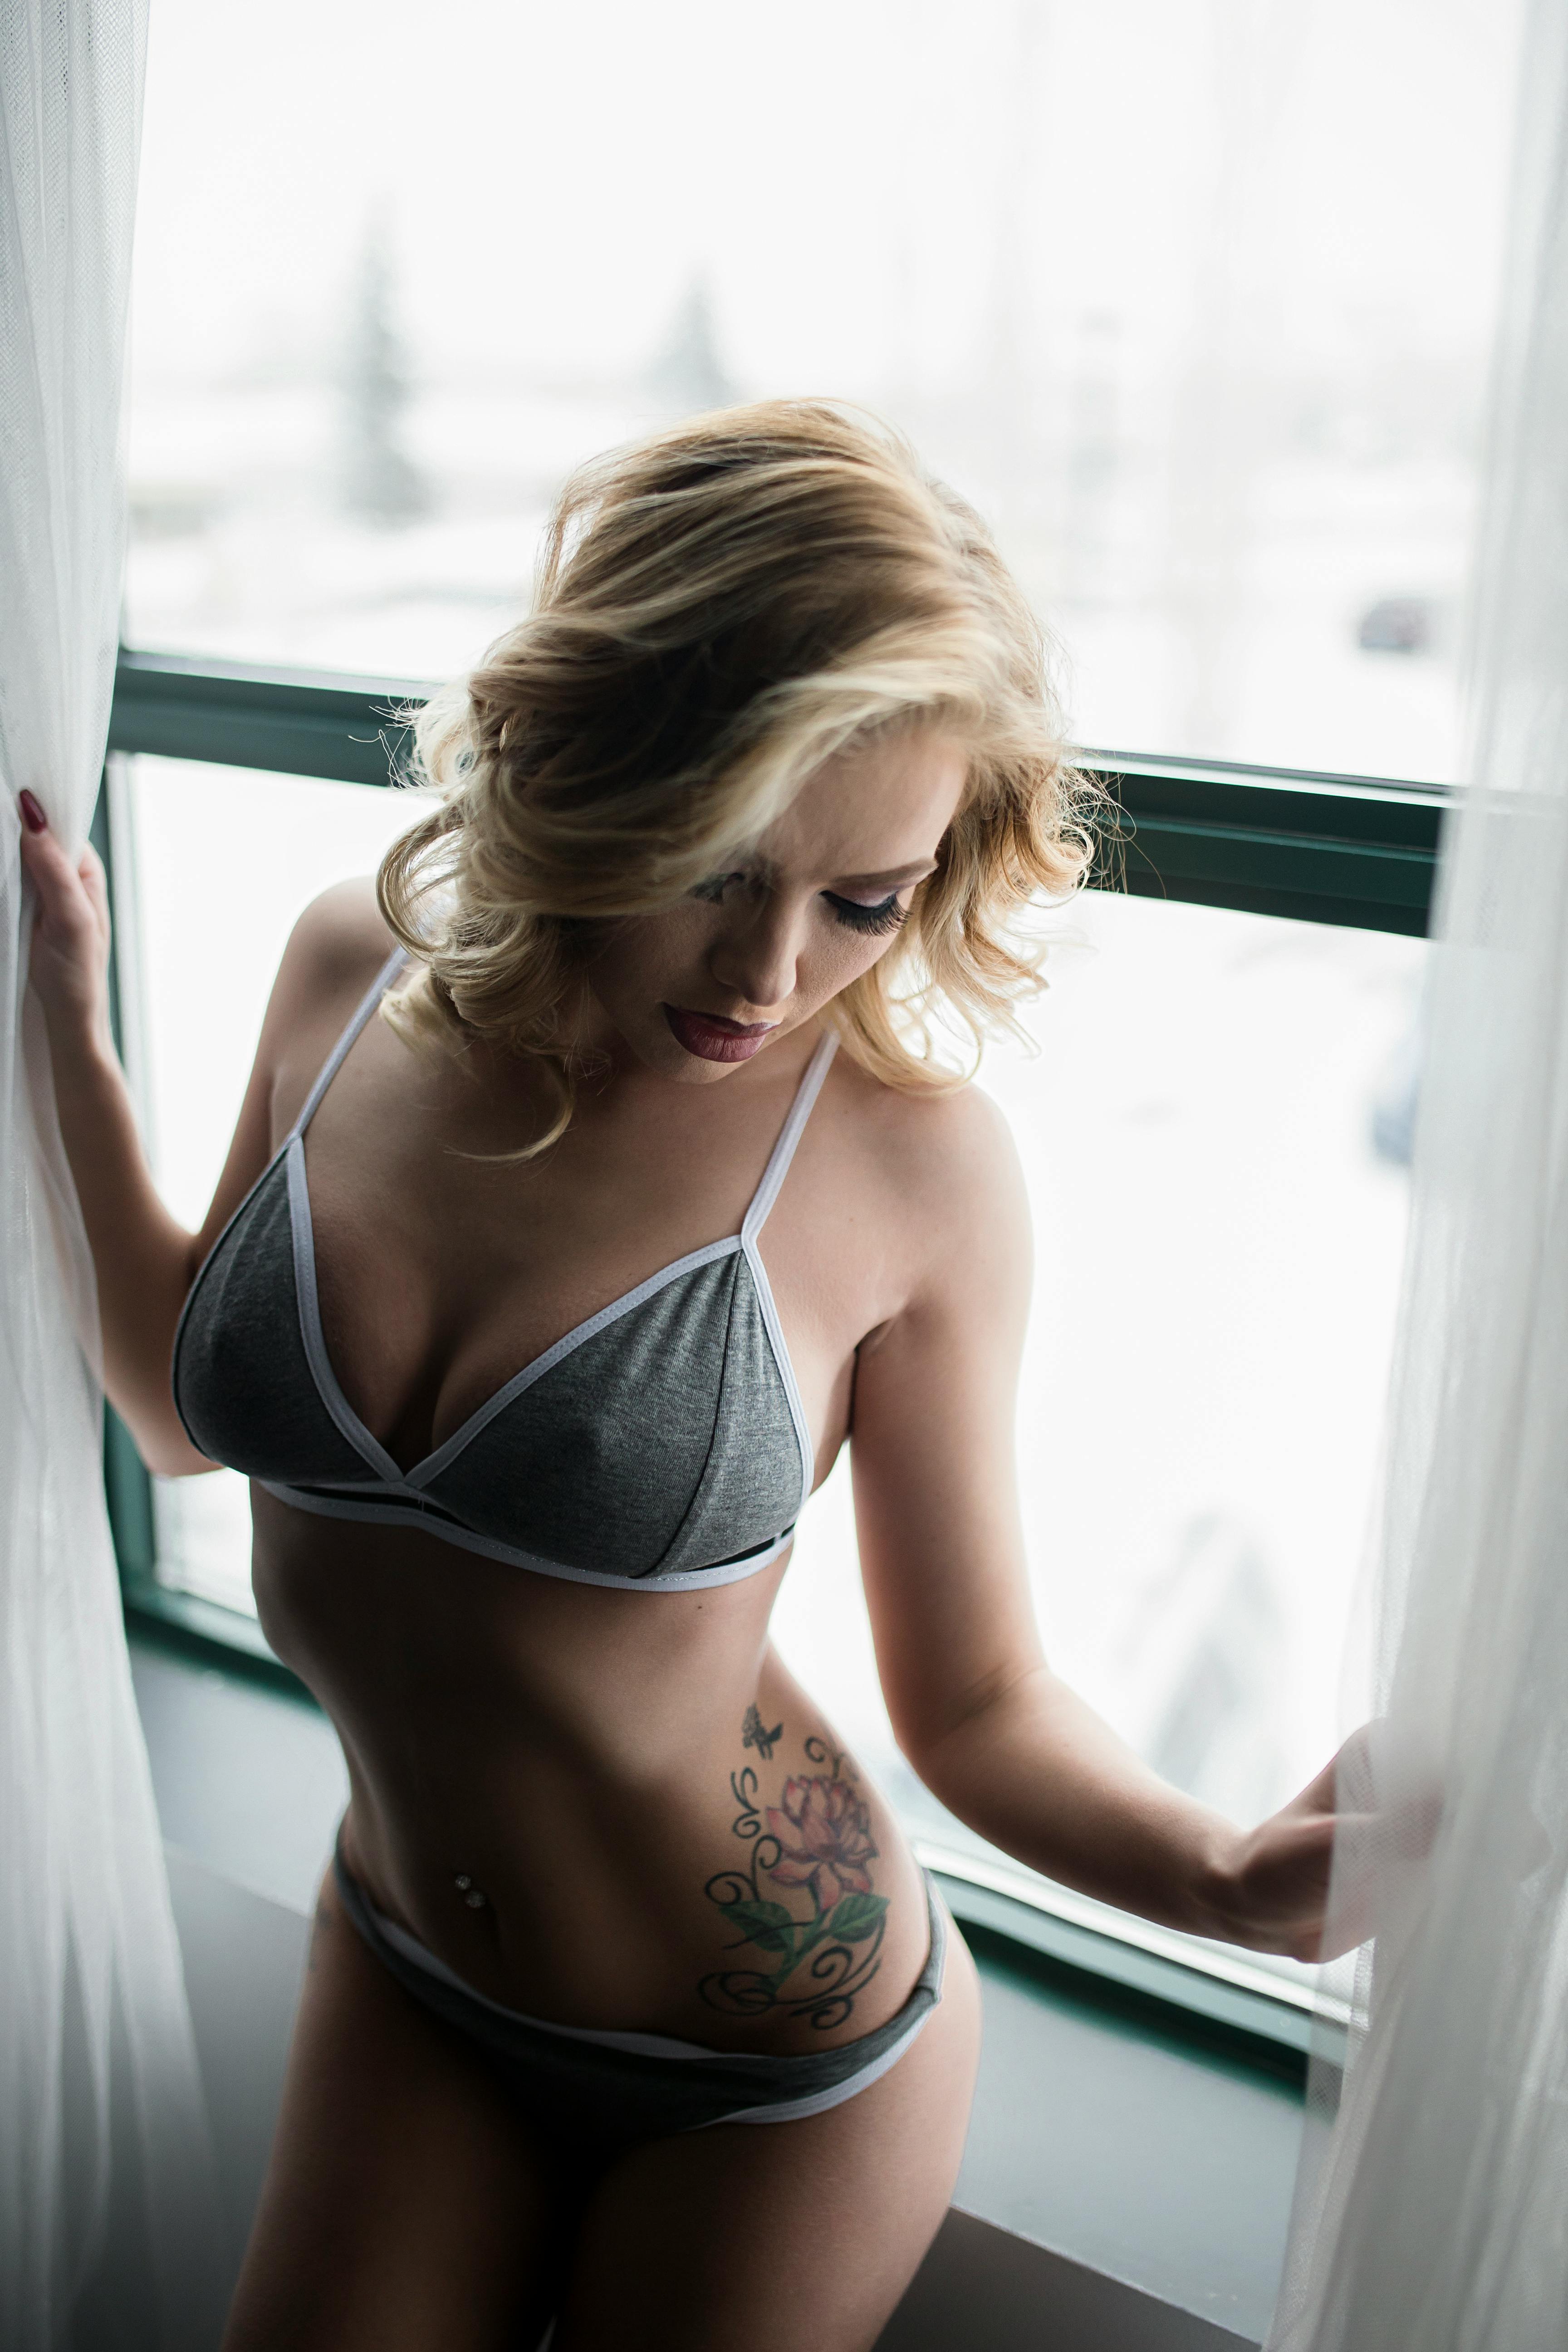
To get the NSFW score of an online image, we add an express GET route to /nsfw. We use this NSFW image from pexels website for this comparison.
Inside the /nsfw route, we call Pixlab's NSFW API endpoint. This endpoint requires 2 parameters. The image link and the API key. When the API responds back, we send the response directly to the client.
app.get("/nsfw", (req, res) => {
  axios
    .get("https://api.pixlab.io/nsfw", {
      params: {
        img: "https://images.pexels.com/photos/2495905/pexels-photo-2495905.jpeg",
        key: process.env.PIXLAB_KEY,
      },
    })
    .then((resp) => res.json(resp.data))
    .catch((err) => console.log(err));
});
For the front-end, create a new web project by making a index.html file along with a javascript file called index.js. Link the javascript file inside the HTML file. The content inside the HTML file looks like this.
<!DOCTYPE html>
<html lang="en">
  <head>
    <meta charset="UTF-8" />
    <meta http-equiv="X-UA-Compatible" content="IE=edge" />
    <meta name="viewport" content="width=device-width, initial-scale=1.0" />
    <title>Pixlab NSFW</title>
  </head>
  <body>
    <script src="./index.js"></script>
  </body>
</html>
Now we need to add a button to invoke our NSFW API call.
<button id="getscore">Get NSFW Score</button>
Now inside the index.js file, we make a function getnsfwscore(). This function lets us make calls to /nsfw endpoint of our proxy server.
const getScore= document.getElementById("getscore");

async function getnsfwscore() {
  try {
    let response =await fetch("http://localhost:5000/nsfw");
    console.log(await response.json());
  } catch (error) {
    throw error;
  }
}
In response, the Pixlab NSFW API returns a NSFW score. The NSFW score ranges from 0 to 1. The typical response from the API looks like this.
{
  "score": 0.7187498807907104,
  "status": 200
}
Now you can use this score to filter the uploaded images.
NSFW Score of Local Image
You can also upload your local images to determine the NSFW score of that image. This is a 2 step process. At first, we upload this image to Pixlab's online storage and get the online link of that image. Then we can follow the previous step with that online image URL provided by Pixlab.
To upload our local image, we use Pixlab's store API. We made a /upload route in our express proxy server. To support image uploads, we use the express-fileupload plugin.
To upload an image to the store API, we make a POST request with the image and the API key. We are using FormData object to construct our query.
app.post("/upload", (req, res) => {
  try {
    if (!req.files || Object.keys(req.files).length === 0) {
      return res.status(400).send("No files were uploaded.");
    }
    let image = req.files.image;

    const form = new FormData();
    form.append("file", image.data, image.name);
    form.append("key", process.env.PIXLAB_KEY);

    form.submit(
      {
        protocol: "https:",
        host: "api.pixlab.io",
        path: "/store",
        method: "POST",
        headers: {
          "Content-Type": `multipart/form-data; boundary=${form.getBoundary()}`,
        },
      },
      (err, resp) => {
        if (err) {
          res.status(503).send("File server is currently unavailable");
        }
        resp.pipe(res);
      }
    );
  } catch (error) {
    res.status(500).send(error);
  }
});
The above code block makes the request and forwards the response to the front end.
In the front-end, we use a file input to get the user's local image.
<input type="file" id="localImage">
Inside our index.js file, we made uploadToStore function to upload the image to our proxy server.
async function uploadToStore(image) {
  const formData = new FormData();
  formData.append("image", image);
  try {
    let response = await fetch("http://localhost:5000/upload", {
      method: "POST",
      body: formData,
    });
    return await response.json();
  } catch (error) {
    throw "Fetch request give some error";
  }
}
Now we listen for any change in the file input. If the user picks any image, we call this uploadToStore function.
const localImage=document.getElementById("localImage");

localImage.addEventListener("change",async(e)=>{
const  files=e.target.files;
  if (files.length >0){
    const file=files[0];
    let response= await uploadToStore(file);
    console.log(response);
  }
})
In response, we get the online image URL of our local image. You can check the image in your browser by using these URLs.
 { ssl_link: "https://s3.amazonaws.com/media.pixlab.xyz/24p62f73c9583ec6.jpeg",
  link: "https://s3.amazonaws.com/media.pixlab.xyz/24p62f73c9583ec6.jpeg",
  id: "24p62f73c9583ec6.jpeg",
  status: 200
}
Now to calculate the NSFW score of this image, you can follow the previous section on getting the NSFW score for an online image.
Blur Images Programmaticaly
After filtering the images as per their NSFW scores, we blur the inappropriate images. To blur an image, we use the blur API endpoint of Pixlab.
We create a GET /blur route in our proxy server to call Pixlab's blur API. The API endpoint requires the image URL, radius of the blur, sigma parameter, and your pixlab API key.
app.get("/blur", (req, res) => {
  axios
    .get("https://api.pixlab.io/blur", {
      params: {
        img: "https://images.pexels.com/photos/2495905/pexels-photo-2495905.jpeg",
        radius: 50,
        sigma: 30,
        key: process.env.PIXLAB_KEY,
      },
    })
    .then((resp) => res.json(resp.data))
    .catch((err) => console.log(err));
});
You can modify the blurring process by varying the radius and sigma parameters.
In the front-end, we make a blurImage function. This function makes a GET request to the /blur endpoint of our proxy server.
async function blurImage(){
  try {
    let response =await fetch("http://localhost:5000/blur");
    console.log(await response.json());
  } catch (error) {
    throw error;
  }
}
In response, the Pixlab server returns a blurred version of your uploaded image. You can use the blur image URL to display in your front end.
{ ssl_link: "https://s3.amazonaws.com/media.pixlab.xyz/24p62f74006c5fa1.jpeg",
  link: "https://s3.amazonaws.com/media.pixlab.xyz/24p62f74006c5fa1.jpeg",
  id: "24p62f74006c5fa1.jpeg",
  status: 200
}
Conclusion
You can find the code samples for this tutorial in my GitHub gist. If you like this tutorial, you can read more interesting tutorials on my blog. If you have any feedback, you can find me on Twitter as @hrishikeshpathak.
Frequently Asked Question
Can we blur our image without using these APIs?
Yes, You can use CSS blur filter to blur any image on your website. Select your HTML image element by using a unique class, id, or using javascript, and then apply the blur filter.
filter: blur(4px);
Learn more about CSS blur filters on the MDN website.
Is using a proxy server mandatory?
No, I am using this proxy server just for demonstration. You can use your own production server for this purpose. I am using a proxy server just to bypass the browser CORS restriction.